Services
EXPLORE OUR SERVICES
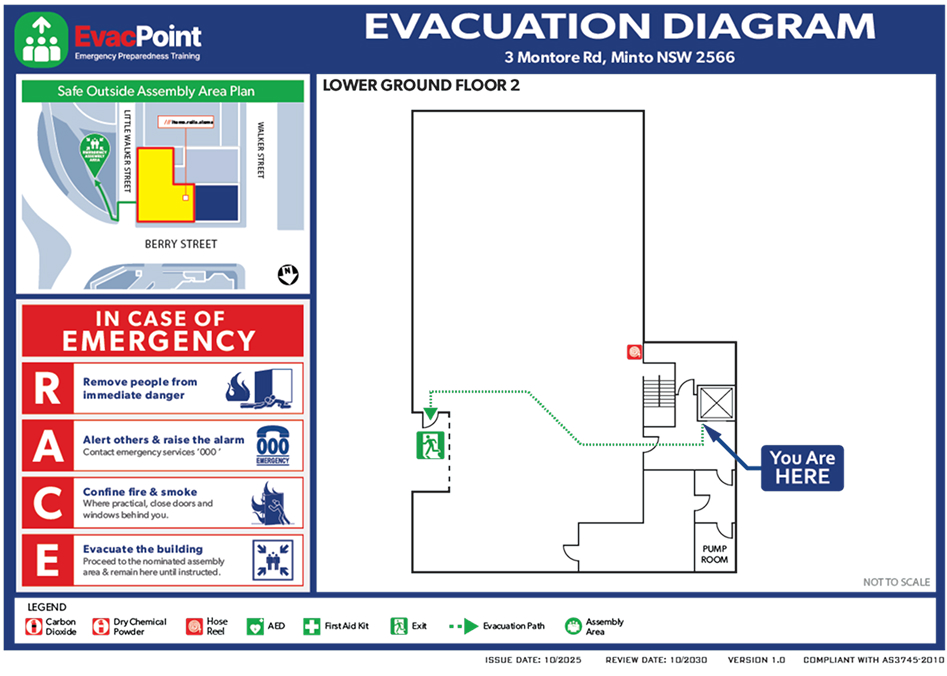
What “A3 AS3745:2010 compliant emergency evacuation diagrams” means
- Standards-based content: The diagrams are produced to meet the requirements of AS 3745:2010 (Planning for emergencies in facilities) — i.e. they include the minimum elements the Standard requires (title “EVACUATION DIAGRAM”, a pictorial floor/area plan, a clear “YOU ARE HERE” marker, designated exits and evacuation paths, locations of firefighting equipment, assembly area(s), a legend, and a validity/date/version box).
- Minimum pictorial size & overall size rules: the pictorial representation on the diagram must be at least 200 mm × 150 mm. The minimum diagram size is A4, but A3 (297 × 420 mm) is required when extra information is included (so most workplace diagrams are A3). This is why you see A3 offered as the compliant option.
- Colour & symbol conventions: evacuation paths, orientation and emergency equipment use standard colours and symbols (e.g. evacuation paths shown in green; extinguishers/hydrants in red; standard legends/symbols from AS 3745 appendices should be used) so the diagrams are instantly readable to occupants.
Professional onsite mark-up — what we do on site (and why it matters)
A compliant, usable evacuation diagram is more than a pretty printout. our onsite mark-up service covers:
- Site survey & verification — we visit the space to confirm actual door positions, door swing direction, room names, corridor widths, locations of fire equipment, alarm panels and any refuge/accessible egress points. This prevents errors that commonly happen when drawing from old CAD or tenant plans. (Best practice recommended by the Standard / industry guidance.)
- You Are Here’ orientation: we place and orient the “YOU ARE HERE” marker so the diagram matches what a person actually sees standing in front of it — that orientation is critical to avoid confusion in an emergency.
- Route & assembly validation: we confirm the most appropriate evacuation routes, exterior assembly area(s) and that the assembly diagram (if shown) is oriented consistently with the floor plan.
- Accessibility & special features: we mark refuges, wheelchair-accessible routes, first-aid/defibrillator locations and hazardous stores where relevant (optional elements per AS3745).
- Placement & height guidance: we advise/fit the diagram at the recommended viewing zone (top of diagram between 1200 mm and 1600 mm above finished floor) so it’s visible and usable to building occupants.
- Proofing with the Emergency Planning Committee (EPC): we supply a draft for EPC review, capture their validation date/version, and incorporate any feedback before final print/installation. The EPC nominates the number and location of diagrams.
Supply options — with or without snaplock frames
- Without frame (direct supply): we deliver printed diagrams (A3 or A4) ready for your facilities team to install. Prints can be laminated or printed on durable stock. Good when you have an installer or want a lower-cost option.
- With snaplock frames (recommended for public areas): snaplock (snap-open) aluminium frames give a professional look, protect the diagram from dirt/UV and make fast updates easy — just snap open the frame and swap the printed sheet when the validation date or layout changes. Snaplock frames come wall-mounting hardware and can be surface-fitted or flush. They’re ideal where periodic updates are expected (revalidations, tenant changes, multi-site rollouts).
- Indoor vs outdoor: for external or exposed locations we recommend weatherproof frames and UV-stable printing/lamination; indoors standard snaplock frames are usually sufficient.